春めいてきましたね。武田です。
前回「JavaScriptで電卓をつくる【前編】」という記事を書きましたので、その続きです。
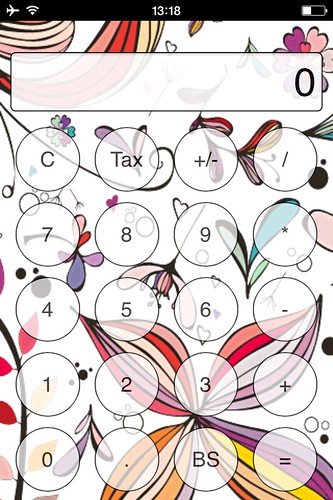
CSSで見た目を電卓っぽくしてみます。
タッチして電卓を実行(ただしスマートフォン/タブレットでないとボタンが押せません)
前回HTMLにおいてinputタグのtype=”button”を利用したのですが、そのときマウスクリックしたときのイベントであるonclickを使いました。実際にアップロードしてスマートフォンで確認すると反応の遅いこと遅いこと!
電卓としてとても使えるレベルではありませんでした。
この部分
<input type="button" value="C" onclick="calc(this)">
どうやらonclickイベントではスマートフォンやタブレットでのタッチに向かないらしく、HTML部分を変更することにしました。
こんな感じ!(ontouchendは、タッチして離したときに発生するイベント)
<input type="button" value="C" ontouchend="calc(this)">
そのほかスマートフォンやタブレットがネット接続していない時でも使えるように記述を追加します。
これは一度読み込んだホームページのデータをブラウザ側にキャッシュ(保存)してもらう機能です。
アプリケーションキャッシュと呼ばれています。
HTML全体
<!DOCTYPE html>
<html manifest="dentaku.appcache">
<head>
<meta charset="utf-8">
<!-- for iPhone -->
<meta name="viewport" content="width=320 ,initial-scale=1.0 ,maximum-scale=1.0, user-scalable=no">
<meta name="apple-mobile-web-app-capable" content="yes">	<!--フルスクリーンモード-->
<link rel="apple-touch-icon" href="icon.png" >	<!--ホームアイコンの設定-->
<meta name="apple-mobile-web-app-status-bar-style" content="black">
<!-- /for iPhone -->

<link rel="stylesheet" href="mystyle.css">
<title>電卓 v1.02</title>
<script src="dentaku.js"></script>
</head>
<body>
<div id="frame">
	<input type="text" value="0" id="display">
	<div id="button_form">
		<input type="button" value="C" ontouchend="calc(this)">
		<input type="button" value="Tax" ontouchend="calc(this)">
		<input type="button" value="+/-" ontouchend="calc(this)">
		<input type="button" value="/" ontouchend="calc(this)"><br>

		<input type="button" value="7" ontouchend="calc(this)">
		<input type="button" value="8" ontouchend="calc(this)">
		<input type="button" value="9" ontouchend="calc(this)">
		<input type="button" value="*" ontouchend="calc(this)"><br>

		<input type="button" value="4" ontouchend="calc(this)">
		<input type="button" value="5" ontouchend="calc(this)">
		<input type="button" value="6" ontouchend="calc(this)">
		<input type="button" value="-" ontouchend="calc(this)"><br>

		<input type="button" value="1" ontouchend="calc(this)">
		<input type="button" value="2" ontouchend="calc(this)">
		<input type="button" value="3" ontouchend="calc(this)">
		<input type="button" value="+" ontouchend="calc(this)"><br>

		<input type="button" value="0" ontouchend="calc(this)">
		<input type="button" value="." ontouchend="calc(this)">
		<input type="button" value="BS" ontouchend="calc(this)">
		<input type="button" value="=" ontouchend="calc(this)">
	</div>
</div>
</body>
</html>
キャッシュしたい画像やファイルを拡張子がappcacheのファイルに記述します。
CACHE MANIFEST
# 電卓 ver 1.02
CACHE:
index.html
dentaku.js
mystyle.css
calligraphy.png

NETWORK:
キャッシュ機能は強力なので、もしプログラムに変更があった場合は、バージョン情報などを記述しておいてバージョン番号を変えるなどしてから再度アップロードするようにしてください。
最後にCSSを設定して電卓っぽくしました。
iPhoneのSafariではボタンが全て丸くなってしまうため解除するための記述もしています。(これには学生と一緒に悩みました)
*{
	margin: 0;
	padding: 0;
}
#frame{
	width: 320px;
	height: 480px;
	text-align: center;
	background-color: #ddd;
	background-image: url("calligraphy.png");
}
#display{
	text-align: right;
	margin: 10px;
	margin-top: 30px;
	padding: 5px;
	border: solid 1px #000;
	font-size: 38px;
	width: 288px;
	opacity: 0.9;
}
/* iPhoneでボタンが丸くなってしまうのが嫌な人用 */
input[type="button"]{
	-webkit-appearance: none;
}
#button_form input[type="button"]{
	width: 62px;
	height: 62px;
	font-size: 20px;
	margin: 5px;
	background-color: #fff;
	border: solid 1px #000;
	border-radius: 31px;
	opacity: 0.7;
}
今回のデータはこちらに置いてあります。
背景画像を変えるとあら不思議!オリジナル電卓になります。
ぜひ、挑戦してみてください。
\ 最新情報をチェック /